
当今世界日益依赖数据驱动决策,因此每位开发者都应当了解网络数据抓取技术,以便从互联网提取数据。本文将带您学习:
- 安装 Golang 开发环境,包括所需的库与依赖项。
- 从零开始搭建一个简单的 Go 数据抓取机器人。
- 运用进阶的 Golang 数据抓取技术。
- 优化抓取工具以实现更高性能。
- 测试并维护您的 Golang 数据抓取机器人。
马上开始吧!
什么是 Golang 网络数据抓取?
网络数据抓取是指自动从网站提取数据的过程。像Walmart这样的公司,必须确保其商品价格低于或至少持平于 Amazon 等竞争对手,才能保持竞争力。如果 Amazon 是您的抓取目标,可以参考我们的Amazon 网络数据抓取指南,其中介绍了针对该平台的具体技术及需要应对的反爬虫挑战。不过,若要人工收集成千上万甚至数百万件商品的价格数据,将非常耗时。
为了获取这些信息,企业会使用能够快速高效地从成千上万个商品页面自动提取数据的抓取工具。这些工具依据预先编写的指令执行特定任务。
如果您正考虑部署一款数据抓取工具,有两种选择:购买现成的抓取机器人,或自行开发。前者固然便捷,但您将因此失去定制化功能——而这些功能只有自主开发的抓取工具才能提供。
因此,更好的做法是学习如何自行搭建数据抓取工具。为此,您需要使用一种编程语言。可选项众多,各有优劣。Golang就是不错的选择,原因如下:
- 性能出色
Golang 会被编译为机器码,因此比 Python 和JavaScript等解释型语言运行速度更快。
- 原生支持并发
Golang 通过 Goroutine 提供原生并发机制,让数据抓取机器人能够同时处理多项任务。
- 轻量且内存利用率高
Golang 设计精简、内存管理高效,这有助于在处理大型数据集时减少内存膨胀问题。
- 标准库丰富
Golang 自带功能完善的标准库,包括用于发送网络请求的 net/http、用于解析 HTML 的 html/template,以及用于处理 JSON 数据的 encoding/json。
如果您想知道 Golang 数据抓取方法能实现哪些功能,请继续阅读。
Golang 网络数据抓取的使用场景
以下是 2024 年网络数据抓取的几种常见应用:
- 市场分析
网络数据抓取可以帮助企业提取竞争对手的定价、产品及整体营销策略信息,并据此调整自身策略以保持竞争力。
- 情感分析
品牌声誉是决定企业成功与否的关键因素之一。企业会从 Trustpilot 等点评网站和 Instagram 等社交媒体平台提取客户评价与情感数据,并据此指导品牌建设工作。
- 获客线索挖掘
数据抓取工具还能从 LinkedIn、Yelp 等各类商业名录中提取联系方式,企业可借助这些信息识别潜在客户、挖掘销售线索。
- AI 模型数据挖掘
数据抓取机器人还会收集训练数据,用于支撑 ChatGPT、Gemini 等主流聊天机器人背后大型 AI 模型的训练。
以上只是网络数据抓取助力各行各业企业的部分示例。只要拥有正确的数据,无论是训练 AI 模型实现任务自动化、收集市场情报,还是满足其他数据驱动需求,几乎都能实现。
搭建 Go 数据抓取工具需要准备什么?
读到这里,您应该已经明白为什么网络数据抓取如此重要——归根结底在于所提取数据的价值。那么,该如何从零开始搭建一个 Go 数据抓取工具呢?这一过程比想象中简单,在开始之前,请确保已安装好所有必备环境。
搭建 Golang 开发环境
首先,请确认设备上已安装 Golang。如果尚未安装,请参考以下针对各主流操作系统的分步指南:
macOS
- 步骤 1:打开浏览器,访问Go 官方网站,下载适用于 macOS 的 .pkg 安装包:
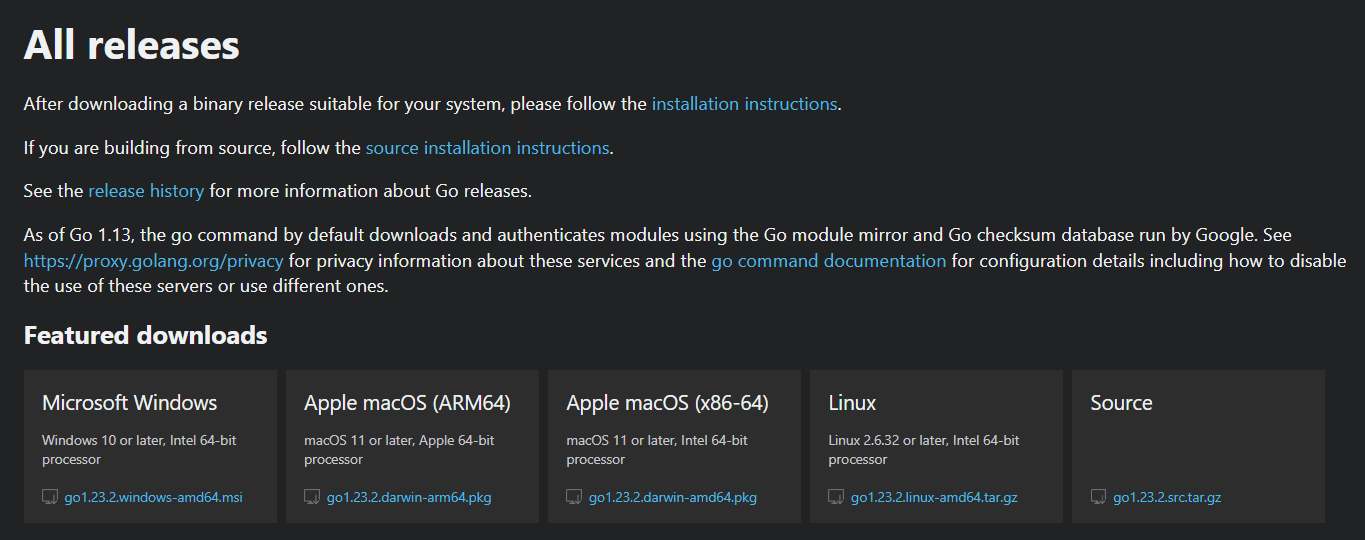
- 步骤 2:打开下载的文件,按照安装提示操作,点击“继续”以接受条款。
- 步骤 3:根据您使用的 shell 编辑其配置文件,以下是 bash 用户的代码:
nano ~/.bash_profile
- 步骤 4:编辑 zsh 配置文件(使用 bash 的用户可跳过此步):
nano ~/.zshrc
步骤 5:在文件中添加以下这一行:
export PATH=$PATH:/usr/local/go/bin
步骤 6:执行以下代码以重新加载配置文件:
source ~/.zshrc // for zsh
source ~/.zshrc //for bash
步骤 7:执行以下命令验证安装:
go version
此时屏幕上应会显示已安装的 Go 版本号。
Windows
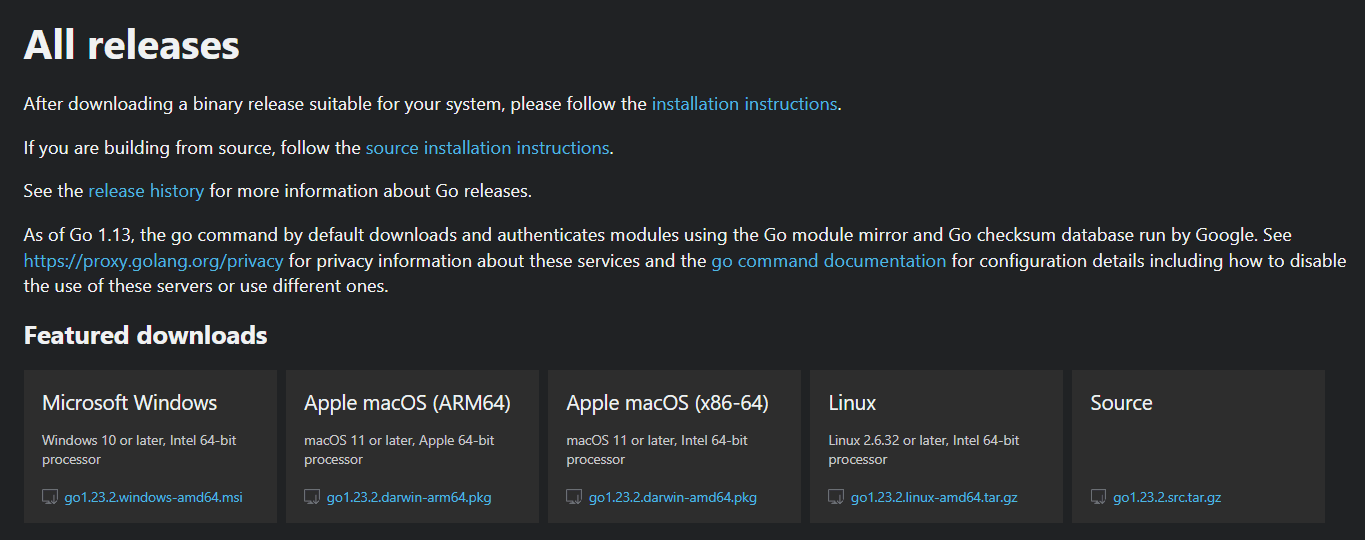
- 步骤 1:访问Go 官方网站,下载如下图所示的 .msi 安装程序:
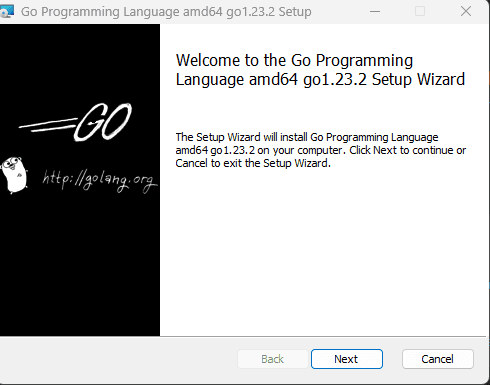
步骤 2:打开下载的文件,接受许可协议,然后点击“下一步”。
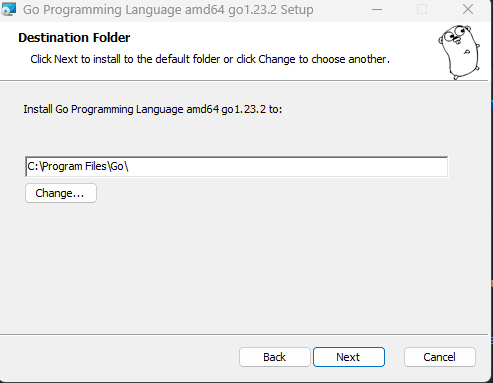
步骤 3:选择安装文件夹,点击“下一步”开始安装:
步骤 4:打开命令提示符,输入以下命令以验证安装:
go version
若安装成功,屏幕上会显示 Go 版本号。
Linux
Linux 用户可以通过官方二进制文件或包管理器两种方式安装 Go。
方式一:使用官方二进制文件
- 步骤 1:访问Go 官方网站,下载与您系统架构相匹配的 .tar.gz 文件:
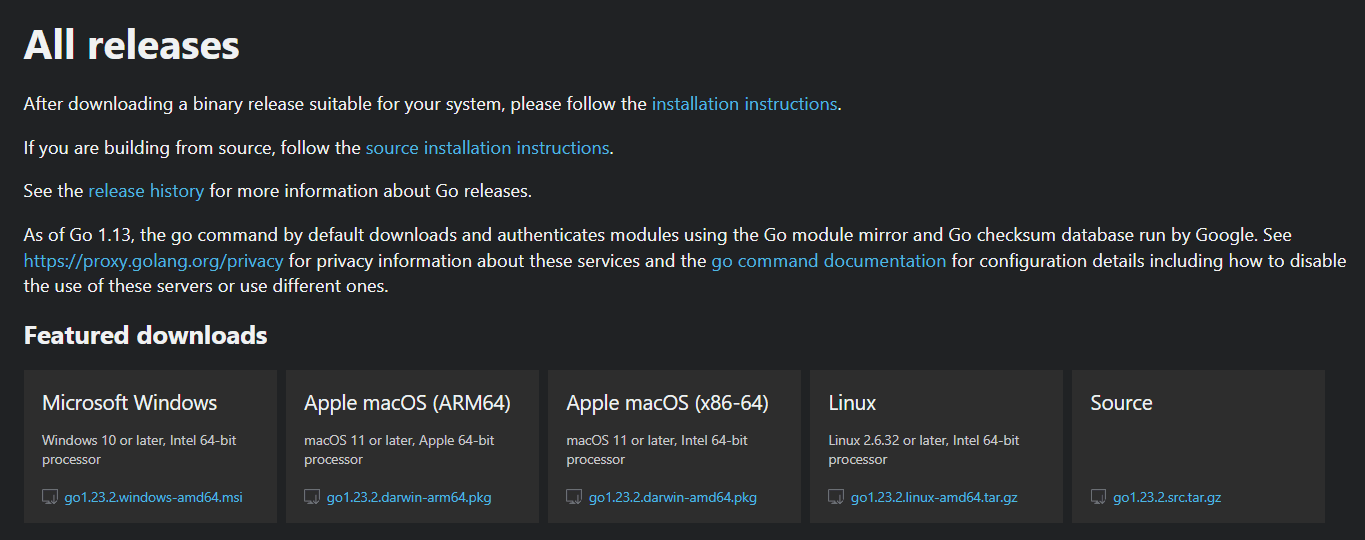
- 步骤 2:打开终端,执行以下代码解压文件:
sudo tar -C /usr/local -xzf go<version>.linux-amd64.tar.gz
- 步骤 3:如果使用 bash,请在 shell 配置文件中添加以下这一行以设置环境变量:
nano ~/.bashrc
- 步骤 4:zsh 用户请在 shell 配置文件中添加以下这一行(若已完成步骤 3 可跳过):
nano ~/.zshrc
步骤 5:在配置文件中添加以下命令:
export PATH=$PATH:/usr/local/go/bin
- 步骤 6:重新加载配置文件:
source ~/.bashrc # Or use ~/.zshrc if using zsh
- 步骤 7:执行以下命令验证安装:
go version
屏幕上应会显示 Go 版本号。
方式二:使用包管理器(Ubuntu/Debian)
- 步骤 1:执行以下命令更新软件包列表:
sudo apt update
- 步骤 2:安装 Go:
sudo apt install golang-go
- 步骤 3:验证安装:
go version
若安装成功,屏幕上会显示 Go 版本号。
所需的库与依赖项
设备上安装好 Go 之后,接下来需要配置数据抓取工具所需的库与依赖项,请先安装以下几个库:
- Goquery
这是一个功能强大的 Go 库,可以轻松处理和查询 HTML 文档,支持通过 CSS 选择器从网页中选取、筛选并提取信息。请在终端中执行以下命令安装 Goquery:
go get github.com/PuerkitoBio/goquery
- Colly
Colly 是一个用 Go 编写的高层级数据抓取框架,能够简化发送请求、处理响应以及管理抓取流程的工作。请执行以下命令在系统中安装 Colly:
go get github.com/gocolly/colly/v2
至此,您已在系统中安装好 Go 及基础依赖项,可以正式开始搭建 Golang 数据抓取工具了,下面进入本文的核心内容:
如何用 Golang 搭建简单的数据抓取工具(分步教程)
接下来我们将编写一个简单的数据抓取工具,从 books.toscrape.com 收集书名。需要说明的是,这是一个虚构的在线书店,专门为网络数据抓取爱好者提供练习场景。下面开始动手:
步骤 1:声明包
每个 Go 程序都必须以包声明开头,以下是声明包的代码:
package main
步骤 2:导入所需的包
以下代码会导入抓取工具提取数据所需的各个包:
import (
"fmt"
"log"
"net/http"
"github.com/PuerkitoBio/goquery"
)
各部分含义如下:
- fmt:提供将输出打印到控制台的函数。
- log:用于记录日志消息与错误信息。
- net/http:提供发送 HTTP 请求并接收响应的工具。
- github.com/PuerkitoBio/goquery:一个第三方库,提供类似 jQuery 的语法,使 HTML 解析更加简便。
步骤 3:编写主函数
main() 函数是 Golang 代码的入口,下面我们逐部分进行拆解:
首先,需要声明主函数,代码如下:
func main() {
接下来,需要声明要抓取的目标 URL:
url := "http://books.toscrape.com"
接下来,需要让抓取机器人向该 URL 发送 HTTP 请求并获取响应。如果程序遇到诸如网站宕机之类的错误,会自动终止运行并打印错误信息,代码如下:
resp, err := http.Get(url)
if err != nil {
log.Fatalf("Error fetching URL %s: %v", url, err)
}
defer resp.Body.Close()
抓取机器人获取到 HTML 内容之后,需要使用 goquery 文档读取该内容。同样,如果该过程失败,机器人应终止程序并返回错误信息,代码如下:
doc, err := goquery.NewDocumentFromReader(resp.Body)
if err != nil {
log.Fatalf("Error parsing HTML: %v", err)
}
为了让输出更易于阅读,需要打印“Book Titles”作为标题信息,代码如下:
fmt.Println("Book Titles:")
接下来,需要编写自动选取书名并作为输出打印的代码部分,以下代码会选取 h3 标签并打印其内容:
doc.Find(".product_pod h3 a").Each(func(index int, item *goquery.Selection) {
title, exists := item.Attr("title")
if exists {
fmt.Printf("Book %d: %s\n", index+1, title)
}
})
最后,需要编写回调函数,以实现异步执行并打印书名:
func(index int, item *goquery.Selection) {
title, exists := item.Attr("title")
if exists {
fmt.Printf("Book %d: %s\n", index+1, title)
}
}
步骤 4:整合完整代码
现在将各部分代码整合为完整脚本:
package main
import (
"fmt"
"log"
"net/http"
"github.com/PuerkitoBio/goquery"
)
func main() {
url := "http://books.toscrape.com"
// Send HTTP GET request
resp, err := http.Get(url)
if err != nil {
log.Fatalf("Error fetching URL %s: %v", url, err)
}
defer resp.Body.Close()
// Parse the HTML response using goquery
doc, err := goquery.NewDocumentFromReader(resp.Body)
if err != nil {
log.Fatalf("Error parsing HTML: %v", err)
}
fmt.Println("Book Titles:")
// Find book titles inside <h3> tags
doc.Find(".product_pod h3 a").Each(func(index int, item *goquery.Selection) {
title, exists := item.Attr("title")
if exists {
fmt.Printf("Book %d: %s\n", index+1, title)
}
})
}
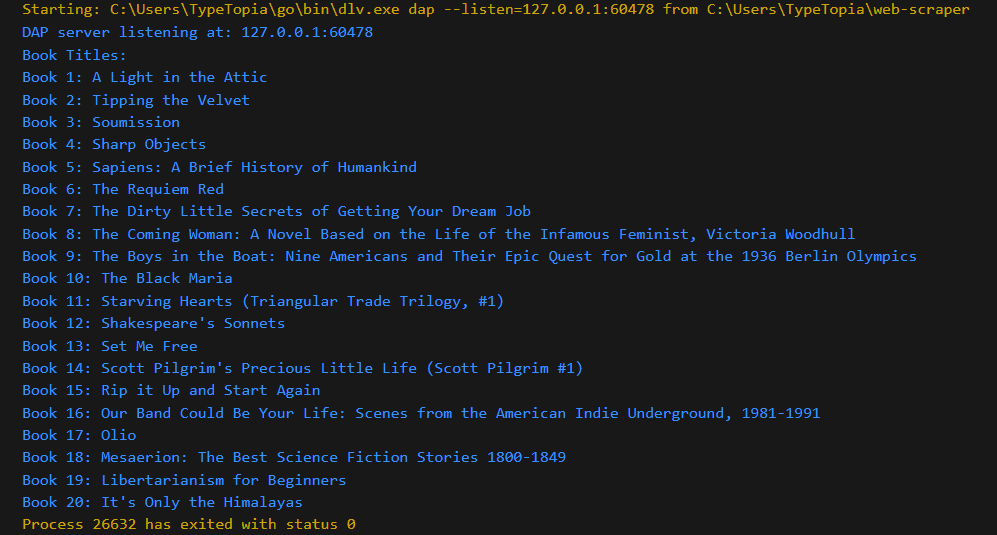
如果按照上述步骤正确操作,输出结果应如下所示,显示 Books to Scrape 网站上的书名:
修改 Go 代码以抓取多页数据
我们刚刚构建的数据抓取机器人只能从 Books to Scrape 的第一页采集书名。如果您想采集前五页的数据,就需要先定义基础 URL,并对上文步骤 3 中的 main 函数做一些修改。下面是具体的修改步骤:
步骤一:定义基础 URL
导入包之后(使用与之前相同的包),您需要定义一个基础 URL,机器人将在翻页时依据它构造下一页的 URL:
const baseURL = "http://books.toscrape.com"
步骤二:修改 main 函数
您需要让 main 函数指示机器人从网站的第一页开始抓取,以下是新的 main 函数:
func main() {
scrapePage(baseURL, 1) // Start scraping from page 1
}
步骤三:添加一个用于抓取单页的函数
接下来,您需要添加一个函数,用于先抓取单个 URL,再转到下一个,代码如下:
func scrapePage(url string, pageNumber int) {
fmt.Printf("\nScraping Page %d: %s\n", pageNumber, url)
// Send HTTP request
resp, err := http.Get(url)
if err != nil {
log.Fatalf("Error fetching URL %s: %v", url, err)
}
defer resp.Body.Close()
// Parse the HTML response
doc, err := goquery.NewDocumentFromReader(resp.Body)
if err != nil {
log.Fatalf("Error parsing HTML: %v", err)
}
// Extract and print book titles for the current page
doc.Find(".product_pod h3 a").Each(func(index int, item *goquery.Selection) {
title, exists := item.Attr("title")
if exists {
fmt.Printf("Book %d: %s\n", index+1, title)
}
})
// Find the link to the next page
nextPage, exists := doc.Find(".next a").Attr("href")
if exists {
nextURL := baseURL + "/" + nextPage // Build the full URL for the next page
scrapePage(nextURL, pageNumber+1) // Recursively scrape the next page with incremented page number
} else {
fmt.Println("\nNo more pages to scrape.")
}
}
下面解释这段代码的含义:
- 该函数首先会打印正在抓取的页码和该页的 URL
- 接着它会向该 URL 发送 HTTP 请求,如果出现问题,就会记录错误信息并终止执行
- 如果机器人成功获取了 HTML 内容,就会使用 Goquery 解析该响应
- 解析完成后,会查找包含书名的特定 HTML 元素,并连同其索引一起打印出来
- 完成一页抓取后,机器人会通过查找 .next a 元素来寻找下一页的链接,然后递归调用 scrapePage 函数抓取下一页
如果没有更多页面可抓取,机器人就会打印该消息并终止程序。
步骤四:用于抓取多页的新代码
把目前为止所做的修改合并起来,完整代码如下:
package main
import (
"fmt"
"log"
"net/http"
"github.com/PuerkitoBio/goquery"
)
// Base URL for the website
const baseURL = "http://books.toscrape.com"
func main() {
scrapePage(baseURL, 1) // Start scraping from page 1
}
// Function to scrape a single page and handle pagination
func scrapePage(url string, pageNumber int) {
fmt.Printf("\nScraping Page %d: %s\n", pageNumber, url)
// Send HTTP GET request
resp, err := http.Get(url)
if err != nil {
log.Fatalf("Error fetching URL %s: %v", url, err)
}
defer resp.Body.Close()
// Parse the HTML response
doc, err := goquery.NewDocumentFromReader(resp.Body)
if err != nil {
log.Fatalf("Error parsing HTML: %v", err)
}
// Extract and print book titles for the current page
doc.Find(".product_pod h3 a").Each(func(index int, item *goquery.Selection) {
title, exists := item.Attr("title")
if exists {
fmt.Printf("Book %d: %s\n", index+1, title)
}
})
// Find the link to the next page
nextPage, exists := doc.Find(".next a").Attr("href")
if exists {
nextURL := baseURL + "/" + nextPage // Build the full URL for the next page
scrapePage(nextURL, pageNumber+1) // Recursively scrape the next page with incremented page number
} else {
fmt.Println("\nNo more pages to scrape.")
}
}
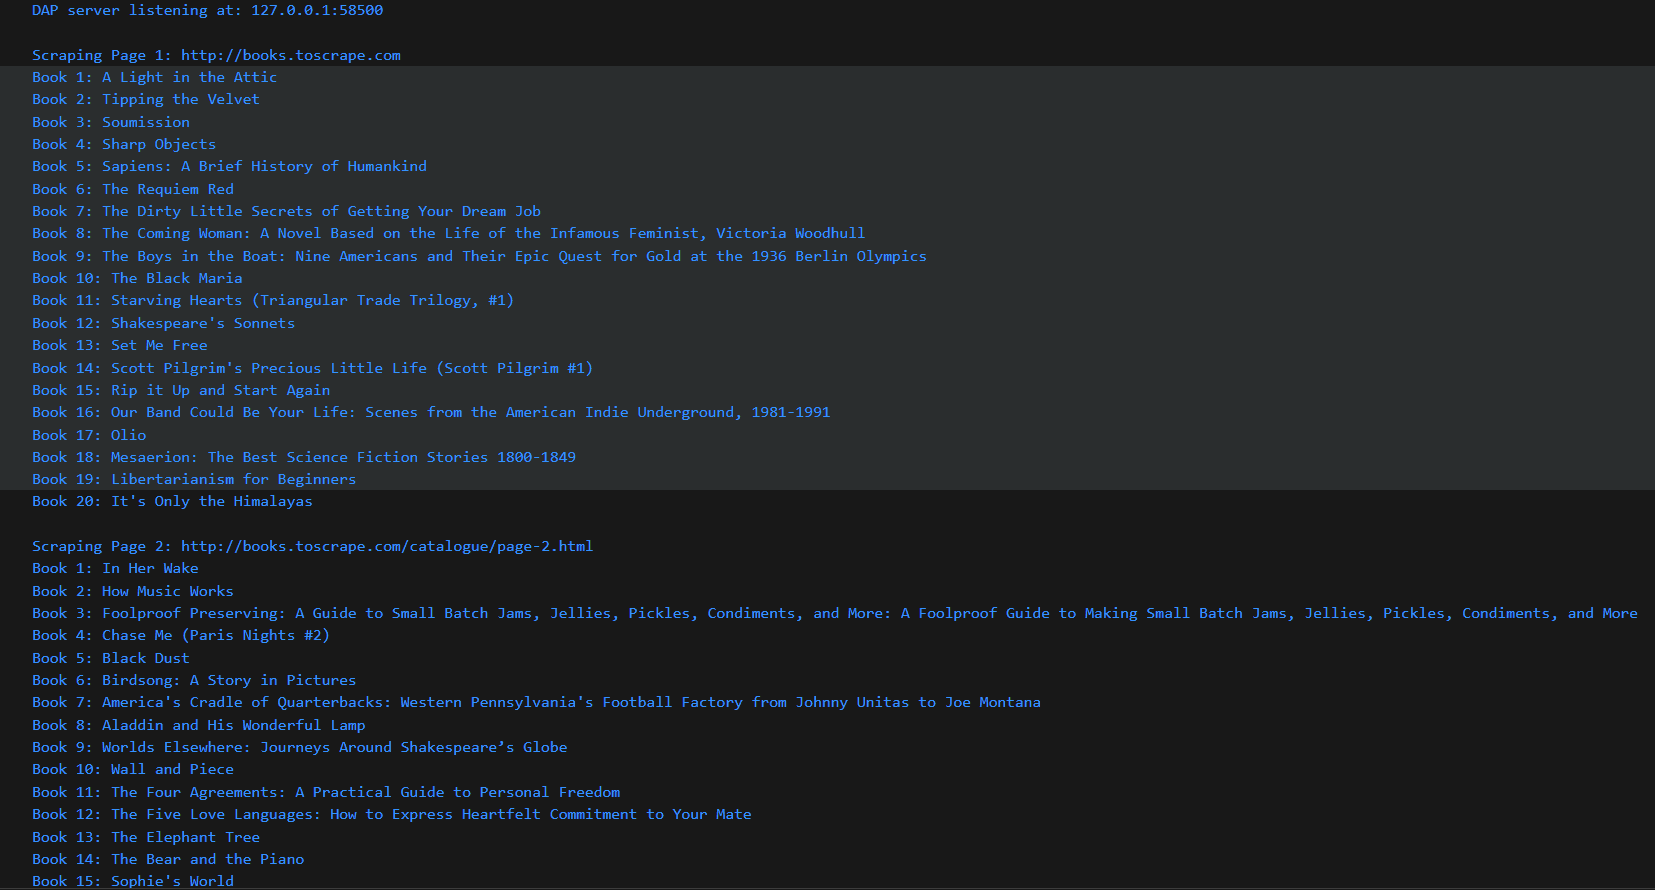
运行这段 Go 数据抓取代码后,返回结果如下:
Golang 网络爬取进阶技巧
到目前为止,您已经掌握了如何编写能够从 Books to Scrape 提取数据的基础数据抓取代码。接下来,我们将更进一步,介绍可以优化代码性能的具体步骤。
处理大量使用 JavaScript 的网站
您是否遇到过带有无限滚动的网站?随着页面滚动,内容会实时更新,带来更快速、更流畅的用户体验,例如Twitter和 Facebook 等平台。这类网站使用 JavaScript 来渲染动态内容。
如果用上面的代码抓取这类网站,就会遇到问题,因为 net/http 库只能获取服务器最初加载的 HTML 内容。这是一项挑战,因为 JavaScript 网站的服务器初始响应中往往不包含完整内容。
那么,该如何用 Golang 从这些网站抓取数据呢?
让我们通过采集一个 JavaScript 网站的数据来一探究竟,一个不错的例子是Quotes to Scrape,它是Books to Scrape中大量使用 JavaScript 的版本——下面我们一起开发一个机器人来采集该网站的数据:
步骤一:安装 Chromedp
net/http 和 Goquery 等传统工具只能获取静态 HTML。相比之下,Chromedp 的行为与真实浏览器一致:它会加载 JavaScript、完整渲染页面,并与按钮、滚动页面等动态元素进行交互。使用以下命令在您的系统中安装 Chromedp:
go get -u github.com/chromedp/chromedp
安装完成后,您就可以编写 Go 数据抓取代码来获取 Quotes to Scrape 网站的数据了,我们继续:
步骤二:声明所需的包
使用以下命令声明机器人将要使用的包:
package main
步骤三:导入包
使用我们一直在用的相同的包:
import (
"context"
"fmt"
"log"
"time"
"github.com/chromedp/chromedp"
)
Step 4: Write Your Main Function
Step 4: Write Your Main Function
The main function for this scraper has several components. We will explain them below. Here is the code:
func main() {
// Create a context with timeout to manage the browser session
ctx, cancel := chromedp.NewContext(context.Background())
defer cancel()
ctx, cancel = context.WithTimeout(ctx, 15*time.Second)
defer cancel()
var bookTitles []string
// Navigate to the target site and scrape book titles
err := chromedp.Run(ctx,
chromedp.Navigate("https://quotes.toscrape.com/js/"), // Change to your dynamic page URL
chromedp.WaitVisible(".quote", chromedp.ByQuery), // Wait for elements to load
chromedp.Evaluate(`
[...document.querySelectorAll('.quote .text')].map(el => el.innerText);
`, &bookTitles), // Collect all book titles or quotes into bookTitles slice
)
if err != nil {
log.Fatalf("Failed to scrape the page: %v", err)
}
// Print the collected titles
fmt.Println("Book Titles / Quotes:")
for i, title := range bookTitles {
fmt.Printf("Item %d: %s\n", i+1, title)
}
}
下面解释这段代码的含义:
- 创建一个带超时的 context
如果动态内容页面加载时间过长,就需要设置超时以防止抓取程序卡死,这正是 main 函数第一部分的作用。
- 使用 Chromedp 的 Navigate 打开网页
接下来,我们使用 chromedp.Navigate() 打开一个无头浏览器会话(您的设备上可能会出现一个空白窗口)。
- 使用 WaitVisible 确保内容加载完成
在处理大量使用 JavaScript 的网站时,内容通常不会一次性加载完成,因此我们必须等待目标内容完全加载后再尝试抓取。
- 用 JavaScript Evaluation 替代 Goquery 来提取数据
在尝试采集数据之前,必须留出时间让 JavaScript 完成页面加载后 HTML 内容的获取。为此,我们使用 chromedp.Evaluate() 函数在浏览器会话中执行 JavaScript,在内容加载完成后将其提取出来。
如果执行过程中出现问题,机器人会停止运行并打印错误信息;如果成功,抓取程序则会打印采集到的条目标题。
步骤五:运行完整代码
以下是从Quotes to Scrape采集 JavaScript 内容的完整代码:
package main
import (
"context"
"fmt"
"log"
"time"
"github.com/chromedp/chromedp"
)
func main() {
// Create a context with timeout to manage the browser session
ctx, cancel := chromedp.NewContext(context.Background())
defer cancel()
ctx, cancel = context.WithTimeout(ctx, 15*time.Second)
defer cancel()
var bookTitles []string
// Navigate to the target site and scrape book titles
err := chromedp.Run(ctx,
chromedp.Navigate("https://quotes.toscrape.com/js/"), // Change to your dynamic page URL
chromedp.WaitVisible(".quote", chromedp.ByQuery), // Wait for elements to load
chromedp.Evaluate(`
[...document.querySelectorAll('.quote .text')].map(el => el.innerText);
`, &bookTitles), // Collect all book titles or quotes into bookTitles slice
)
if err != nil {
log.Fatalf("Failed to scrape the page: %v", err)
}
// Print the collected titles
fmt.Println("Book Titles / Quotes:")
for i, title := range bookTitles {
fmt.Printf("Item %d: %s\n", i+1, title)
}
}
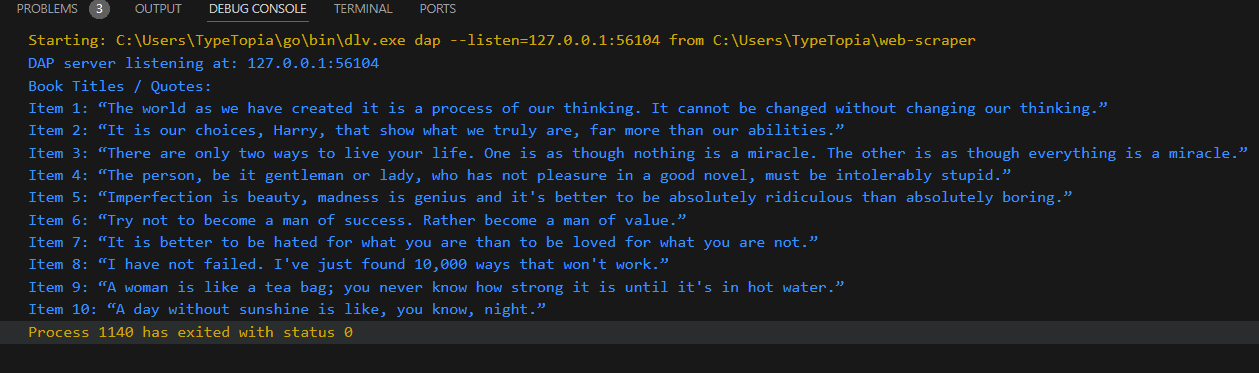
如果一切顺利,您应该会得到如下响应:
在 Golang 中处理 API 和 JSON 响应
一些网站提供 API,让用户可以请求特定数据。一个不错的例子是 Twitter(几乎没人真的叫它 X):您可以通过 Twitter 的 API 获取推文、用户信息和热门趋势,不过近年来此类信息的访问方式已有所变化。无论如何,从提供 JSON 响应的 API 中抓取数据效率更高,因为无需解析 HTML 内容。同时,由于大多数 API 都有公开的服务条款来规范使用方式,涉及法律风险的可能性也更低。
让我们修改数据抓取脚本,从JSONPlaceholder API采集数据,该 API 提供用于练习 API 数据提取方法的模拟数据,其中包含六类常用资源可供使用:
- 帖子(100 条):https://jsonplaceholder.typicode.com/posts
- 评论(500 条):https://jsonplaceholder.typicode.com/comments
- 相册(100 个):https://jsonplaceholder.typicode.com/albums
- 照片(5000 张):https://jsonplaceholder.typicode.com/photos
- 待办事项(200 条): https://jsonplaceholder.typicode.com/todos
- 用户(10 个):https://jsonplaceholder.typicode.com/users
具体如何操作呢?让我们编写代码,从 /posts 中获取前 10 篇博客文章的标题。
步骤一:使用以下命令声明 main 包
package main
步骤二:使用以下代码导入所需的包
i
mport (
"encoding/json"
"fmt"
"log"
"net/http"
)
下面解释这段代码的含义:
- encoding/json:处理JSON 数据与 Go 结构体之间的相互转换
- fmt:提供 Printf、Println 等函数,用于将文本打印到控制台
- log:用于记录错误和调试信息
- net/http:发送HTTP 请求并获取 API 的响应
步骤三:定义 Post 结构体
使用以下代码定义 Post 结构体:
type Post struct {
UserID int `json:"userId"`
ID int `json:"id"`
Title string `json:"title"`
Body string `json:"body"`
}
该结构体用于对应 API 返回的每条帖子的结构,其中 UserID、ID 等字段名对应 API 响应中的 JSON 键。
步骤四:编写 main 函数
main 函数由以下几个部分组成:
func main() {
url := "https://jsonplaceholder.typicode.com/posts"
resp, err := http.Get(url)
if err != nil {
log.Fatalf("Error fetching posts: %v", err)
}
defer resp.Body.Close()
var posts []Post
if err := json.NewDecoder(resp.Body).Decode(&posts); err != nil {
log.Fatalf("Error decoding JSON: %v", err)
}
fmt.Println("First 10 Blog Post Titles:")
for i := 0; i < 10; i++ {
fmt.Printf("%d. %s\n", i+1, posts[i].Title)
}
}
让我们仔细看看这个 main 函数:
- 它首先定义了我们要采集数据的 URL 端点。
- 接着向该端点发送 HTTP GET 请求,如果请求失败,就会中止逻辑并打印错误信息。
- 然后机器人将提取到的 JSON 数据解码为结构体,并依次打印前 10 篇博客文章的标题。
步骤五:整合所有代码
以下是 JSON API 抓取程序的完整代码:
package main
import (
"encoding/json"
"fmt"
"log"
"net/http"
)
// Struct to map the JSON structure of each post
type Post struct {
UserID int `json:"userId"`
ID int `json:"id"`
Title string `json:"title"`
Body string `json:"body"`
}
func main() {
url := "https://jsonplaceholder.typicode.com/posts"
resp, err := http.Get(url)
if err != nil {
log.Fatalf("Error fetching posts: %v", err)
}
defer resp.Body.Close()
var posts []Post
if err := json.NewDecoder(resp.Body).Decode(&posts); err != nil {
log.Fatalf("Error decoding JSON: %v", err)
}
fmt.Println("First 10 Blog Post Titles:")
for i := 0; i < 10; i++ {
fmt.Printf("%d. %s\n", i+1, posts[i].Title)
}
}
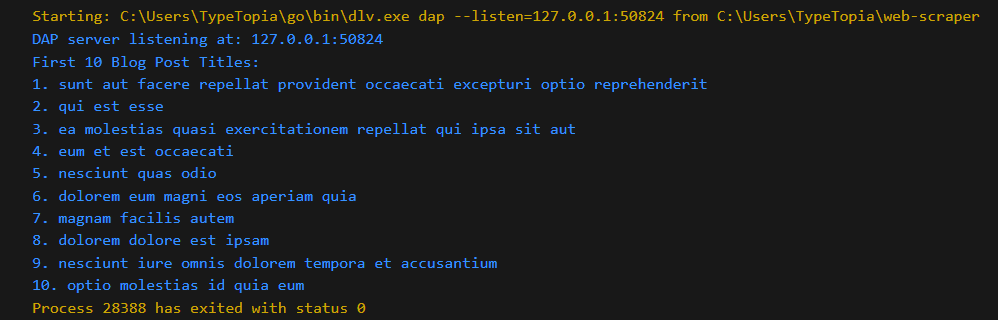
运行这段代码后,应该会打印出前 10 篇博客标题的列表,如下所示:
规避检测:如何绕过数据抓取拦截
到这一步,您已经可以算是初步掌握了网络爬取技术。您已经学会了如何用 Golang 从传统 HTML 网站、使用 JavaScript 的动态网站,以及提供 JSON 格式数据的 API 中提取静态数据。
但在将这些知识付诸实践之前,有一点您需要了解:大多数网站对数据抓取程序都持谨慎态度。即使 robots.txt 文件允许抓取,当某个 IP 发送过多抓取请求时,网站仍可能对其进行封禁或限制。
要解决这个问题,可以使用一个住宅代理池,让 Golang 抓取程序在其中轮换发送数据提取请求。接下来,我们修改之前用于从 JSON API 的 Posts 资源获取前 10 个标题的代码,回到您的代码并按以下步骤修改:
修改步骤三:导入用于代理轮换的额外库
需要额外导入的包如下:
import (
"encoding/json"
"fmt"
"log"
"net/http"
"net/url"
"strings"
"time"
)
- net/url:用于解析和处理 URL
- strings:用于字符串操作
- time:用于设置超时和速率限制
新增步骤四:添加代理列表
步骤三中定义 Post 结构体的部分保持不变。不过,在声明 main 函数之前,您需要先添加一个代理列表变量,以便将请求通过新的 IP 池进行转发,您可以自由地将列表中的内容替换为自己的代理 IP:
var proxies = []string{
"http://mr45184psO8:MKRYlpZgSa@ultra.marsproxies.com:44443?_country=us&_state=alaska&_session=2n39i3ia&_lifetime=30m",
"http://mr45184psO8:MKRYlpZgSa@ultra.marsproxies.com:44443?_country=us&_state=alaska&_session=7ric72rl&_lifetime=30m",
"http://mr45184psO8:MKRYlpZgSa@ultra.marsproxies.com:44443?_country=us&_state=alaska&_session=jvtuogsy&_lifetime=30m",
"http://mr45184psO8:MKRYlpZgSa@ultra.marsproxies.com:44443?_country=us&_state=alaska&_session=po3xt1w7&_lifetime=30m",
"http://mr45184psO8:MKRYlpZgSa@ultra.marsproxies.com:44443?_country=us&_state=alaska&_session=88gijk21&_lifetime=30m",
"http://mr45184psO8:MKRYlpZgSa@ultra.marsproxies.com:44443?_country=us&_state=alaska&_session=wes8szpl&_lifetime=30m",
"http://mr45184psO8:MKRYlpZgSa@ultra.marsproxies.com:44443?_country=us&_state=alaska&_session=ntsyd9ux&_lifetime=30m",
"http://mr45184psO8:MKRYlpZgSa@ultra.marsproxies.com:44443?_country=us&_state=alaska&_session=5myzrqnk&_lifetime=30m",
"http://mr45184psO8:MKRYlpZgSa@ultra.marsproxies.com:44443?_country=us&_state=alaska&_session=80ow4rs7&_lifetime=30m",
"http://mr45184psO8:MKRYlpZgSa@ultra.marsproxies.com:44443?_country=us&_state=alaska&_session=i7f4cx3y&_lifetime=30m",
}
新增步骤五:定义一个用于创建带代理的 HTTP 客户端的函数
使用以下代码创建该函数:
func createProxyClient(proxyURL string) (*http.Client, string) {
parsedURL, err := url.Parse(proxyURL)
if err != nil {
log.Fatalf("Failed to parse proxy URL %s: %v", proxyURL, err)
}
proxyIP := strings.Split(parsedURL.Host, ":")[0]
transport := &http.Transport{
Proxy: http.ProxyURL(parsedURL),
}
return &http.Client{
Transport: transport,
Timeout: 15 * time.Second,
}, proxyIP
}
由于我们希望每个请求都通过不同的 IP 地址发送,这个函数会通过创建 HTTP 客户端来确保代理生效
新增步骤六:创建一个用于抓取单个 URL 的函数
接下来,您需要编写一个用于抓取单个 URL 的函数,代码如下:
// Function to scrape a single URL
func scrapeURL(targetURL string, proxy string) {
client, proxyIP := createProxyClient(proxy) // Create an HTTP client with the proxy
resp, err := client.Get(targetURL)
if err != nil {
log.Printf("Failed to fetch %s using proxy %s: %v", targetURL, proxyIP, err)
return
}
defer resp.Body.Close()
var post Post
if err := json.NewDecoder(resp.Body).Decode(&post); err != nil {
log.Printf("Error decoding JSON from %s using proxy %s: %v", targetURL, proxyIP, err)
return
}
该函数会使用我们创建的 HTTP 客户端及其对应的代理 IP 抓取目标 URL。然后将 JSON 响应解码为 Post 结构体,并连同所使用的代理一起打印出标题。
新增步骤七(原步骤四):修改 main 函数
此前,main 函数只会获取博客文章的标题,并对前 10 篇文章重复这一提取过程。现在,我们希望借助代理,让每个请求都使用从步骤四定义的代理池中随机选取的不同 IP 地址发送。使用以下代码:
func main() {
urls := []string{
"https://jsonplaceholder.typicode.com/posts/1",
"https://jsonplaceholder.typicode.com/posts/2",
"https://jsonplaceholder.typicode.com/posts/3",
"https://jsonplaceholder.typicode.com/posts/4",
"https://jsonplaceholder.typicode.com/posts/5",
"https://jsonplaceholder.typicode.com/posts/6",
"https://jsonplaceholder.typicode.com/posts/7",
"https://jsonplaceholder.typicode.com/posts/8",
"https://jsonplaceholder.typicode.com/posts/9",
"https://jsonplaceholder.typicode.com/posts/10",
}
// Scrape each URL using a different proxy
for i, url := range urls {
proxy := proxies[i%len(proxies)] // Rotate proxies
scrapeURL(url, proxy) // Scrape the URL
}
fmt.Println("All requests completed.")
}
这段代码首先列出要抓取的 URL,然后通过调用步骤五和步骤六中定义的函数,让请求在步骤四定义的代理池中的不同 IP 之间轮换。
步骤八:运行完整的修改后代码
以下是需要运行的完整修改后代码:
package main
import (
"encoding/json"
"fmt"
"log"
"net/http"
"net/url"
"strings"
"time"
)
// Struct to map the API JSON response
type Post struct {
UserID int `json:"userId"`
ID int `json:"id"`
Title string `json:"title"`
Body string `json:"body"`
}
// List of proxies with username-password authentication
var proxies = []string{
"http://mr45184psO8:MKRYlpZgSa@ultra.marsproxies.com:44443?_country=us&_state=alaska&_session=2n39i3ia&_lifetime=30m",
"http://mr45184psO8:MKRYlpZgSa@ultra.marsproxies.com:44443?_country=us&_state=alaska&_session=7ric72rl&_lifetime=30m",
"http://mr45184psO8:MKRYlpZgSa@ultra.marsproxies.com:44443?_country=us&_state=alaska&_session=jvtuogsy&_lifetime=30m",
"http://mr45184psO8:MKRYlpZgSa@ultra.marsproxies.com:44443?_country=us&_state=alaska&_session=po3xt1w7&_lifetime=30m",
"http://mr45184psO8:MKRYlpZgSa@ultra.marsproxies.com:44443?_country=us&_state=alaska&_session=88gijk21&_lifetime=30m",
"http://mr45184psO8:MKRYlpZgSa@ultra.marsproxies.com:44443?_country=us&_state=alaska&_session=wes8szpl&_lifetime=30m",
"http://mr45184psO8:MKRYlpZgSa@ultra.marsproxies.com:44443?_country=us&_state=alaska&_session=ntsyd9ux&_lifetime=30m",
"http://mr45184psO8:MKRYlpZgSa@ultra.marsproxies.com:44443?_country=us&_state=alaska&_session=5myzrqnk&_lifetime=30m",
"http://mr45184psO8:MKRYlpZgSa@ultra.marsproxies.com:44443?_country=us&_state=alaska&_session=80ow4rs7&_lifetime=30m",
"http://mr45184psO8:MKRYlpZgSa@ultra.marsproxies.com:44443?_country=us&_state=alaska&_session=i7f4cx3y&_lifetime=30m",
}
// Function to create an HTTP client with a proxy
func createProxyClient(proxyURL string) (*http.Client, string) {
parsedURL, err := url.Parse(proxyURL)
if err != nil {
log.Fatalf("Failed to parse proxy URL %s: %v", proxyURL, err)
}
// Extract the proxy IP from the parsed URL's Host
proxyIP := strings.Split(parsedURL.Host, ":")[0]
transport := &http.Transport{
Proxy: http.ProxyURL(parsedURL),
}
return &http.Client{
Transport: transport,
Timeout: 15 * time.Second,
}, proxyIP
}
// Scrape a URL using the proxy-enabled client
// Function to scrape a single URL
func scrapeURL(targetURL string, proxy string) {
client, proxyIP := createProxyClient(proxy) // Create an HTTP client with the proxy
resp, err := client.Get(targetURL)
if err != nil {
log.Printf("Failed to fetch %s using proxy %s: %v", targetURL, proxyIP, err)
return
}
defer resp.Body.Close()
var post Post
if err := json.NewDecoder(resp.Body).Decode(&post); err != nil {
log.Printf("Error decoding JSON from %s using proxy %s: %v", targetURL, proxyIP, err)
return
}
fmt.Printf("Fetched post %d: %s (via proxy: %s)\n", post.ID, post.Title, proxyIP)
}
func main() {
urls := []string{
"https://jsonplaceholder.typicode.com/posts/1",
"https://jsonplaceholder.typicode.com/posts/2",
"https://jsonplaceholder.typicode.com/posts/3",
"https://jsonplaceholder.typicode.com/posts/4",
"https://jsonplaceholder.typicode.com/posts/5",
"https://jsonplaceholder.typicode.com/posts/6",
"https://jsonplaceholder.typicode.com/posts/7",
"https://jsonplaceholder.typicode.com/posts/8",
"https://jsonplaceholder.typicode.com/posts/9",
"https://jsonplaceholder.typicode.com/posts/10",
}
for i, url := range urls {
proxy := proxies[i%len(proxies)] // Rotate proxies
scrapeURL(url, proxy) // Scrape the URL
}
fmt.Println("All requests completed.")
}
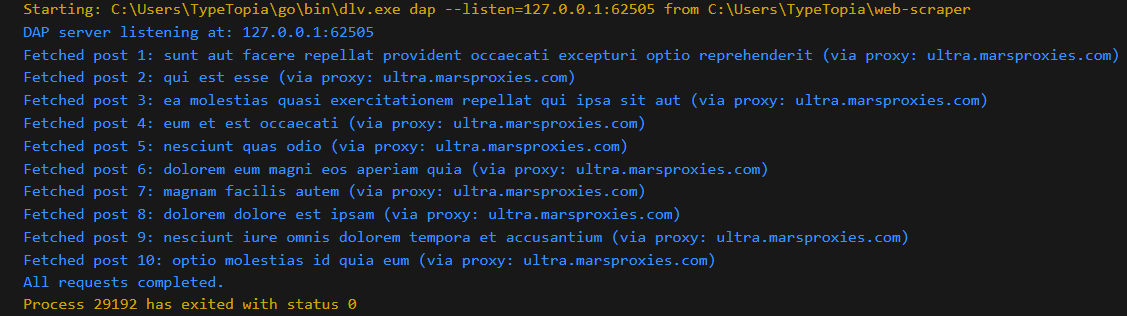
以下是预期输出:
让你的 Golang 爬虫在 2026 年不再被封禁
获取住宅代理如何优化 Golang 网络爬虫以提升性能
现在,您已能创建 Golang 数据抓取程序,根据可用资源从网站或 API 中提取静态或动态数据。接下来让我们更进一步,看看如何提升爬虫的性能。具体来说,我们将对之前用于从 JSON Placeholder API 抓取数据的代码进行三项重要升级:
- 使用 Goroutine 实现并发与并行:提升速度与效率。
- 速率限制与休眠间隔:控制请求频率,避免服务器过载并被封禁。
- 内存管理:高效处理大规模数据集。
下面我们来逐一介绍。
使用 Goroutine 实现并发与并行
要借助 Goroutine 提升爬虫的速度与效率,您需要执行以下操作:
- 修改第 3 步以导入 Sync 包
在 Golang 中,Goroutine 可让您并发执行函数。要使用它,首先需要在第 3 步中导入 sync 包。以下是第 3 步修改后的代码:
import (
"encoding/json"
"fmt"
"log"
"net/http"
"net/url"
"strings"
"sync" // Added sync package
"time"
)
- 修改第 6 步,添加一个 WaitGroup 参数以跟踪所有 Goroutine 的完成情况
以下是修改后的函数:
// Add WaitGroup as a parameter to track completion of all Goroutines
func scrapeURL(targetURL string, proxy string, wg *sync.WaitGroup) {
defer wg.Done() // Ensure the WaitGroup counter is decremented
client, proxyIP := createProxyClient(proxy)
resp, err := client.Get(targetURL)
if err != nil {
log.Printf("Failed to fetch %s using proxy %s: %v", targetURL, proxyIP, err)
return
}
defer resp.Body.Close()
var post Post
if err := json.NewDecoder(resp.Body).Decode(&post); err != nil {
log.Printf("Error decoding JSON from %s using proxy %s: %v", targetURL, proxyIP, err)
return
}
fmt.Printf("Fetched post %d: %s (via proxy: %s)\n", post.ID, post.Title, proxyIP)
}
添加速率限制与休眠间隔
添加速率限制与休眠间隔可确保目标服务器不会过载,并使爬虫的行为更接近真人以避免被检测。升级代码的方法如下:
- 修改第 3 步以添加新包
您需要导入 math/rand 包以实现随机休眠间隔。以下是第 3 步修改后的代码:
package main
import (
"encoding/json"
"fmt"
"log"
"math/rand" // For random sleep intervals
"net/http"
"net/url"
"strings"
"sync"
"time"
- 修改第 5 步,创建一个每两秒发送一次请求的通道
每个 Goroutine 在发送请求前都会等待两秒。在同一代码块中加入随机等待时间,以使行为更接近真实用户,如下方代码所示:
var limiter = time.Tick(2 * time.Second) // 1 request every 2 seconds
func scrapeURL(targetURL string, proxy string, wg *sync.WaitGroup) {
defer wg.Done()
<-limiter // Wait for the tick to proceed
client, proxyIP := createProxyClient(proxy)
resp, err := client.Get(targetURL)
if err != nil {
log.Printf("Failed to fetch %s using proxy %s: %v", targetURL, proxyIP, err)
return
}
defer resp.Body.Close()
var post Post
if err := json.NewDecoder(resp.Body).Decode(&post); err != nil {
log.Printf("Error decoding JSON from %s using proxy %s: %v", targetURL, proxyIP, err)
return
}
fmt.Printf("Fetched post %d: %s (via proxy: %s)\n", post.ID, post.Title, proxyIP)
// Random sleep interval between 1-3 seconds
time.Sleep(time.Duration(1 + rand.Intn(3)) * time.Second)
}
大规模数据抓取项目的内存管理
在处理大规模数据集时,应使用带缓冲的通道来临时存储采集到的信息,以实现内存管理。您需要修改第 5 步,创建一个带缓冲的通道来存储结果,并将采集到的信息发送到该缓冲区。
// Create a rate limiter to enforce delay between requests
var limiter = time.Tick(2 * time.Second) // 1 request every 2 seconds
// Buffered channel to collect scraping results
var results = make(chan Post, 10) // Store up to 10 posts
// Function to scrape a URL and send the result to the buffered channel
func scrapeURL(targetURL string, proxy string, wg *sync.WaitGroup) {
defer wg.Done() // Decrement WaitGroup counter when done
<-limiter // Wait for the tick to proceed
client, proxyIP := createProxyClient(proxy)
resp, err := client.Get(targetURL)
if err != nil {
log.Printf("Failed to fetch %s using proxy %s: %v", targetURL, proxyIP, err)
return
}
defer resp.Body.Close()
var post Post
if err := json.NewDecoder(resp.Body).Decode(&post); err != nil {
log.Printf("Error decoding JSON from %s using proxy %s: %v", targetURL, proxyIP, err)
return
}
// Send the result to the buffered channel
results <- post
fmt.Printf("Fetched post %d: %s (via proxy: %s)\n", post.ID, post.Title, proxyIP)
// Random sleep interval to simulate human behavior (1-3 seconds)
time.Sleep(time.Duration(1+rand.Intn(3)) * time.Second)
}
整合代码:优化后的 Go 爬虫程序
完成我们讨论过的所有改动后,您的爬虫脚本应如下所示:
package main
import (
"encoding/json"
"fmt"
"log"
"math/rand" // For random sleep intervals
"net/http"
"net/url"
"strings"
"sync"
"time"
)
// Struct to map the API JSON response
type Post struct {
UserID int `json:"userId"`
ID int `json:"id"`
Title string `json:"title"`
Body string `json:"body"`
}
// List of proxies with username-password authentication
var proxies = []string{
"http://mr45184psO8:MKRYlpZgSa@ultra.marsproxies.com:44443?_country=us&_state=alaska&_session=2n39i3ia&_lifetime=30m",
"http://mr45184psO8:MKRYlpZgSa@ultra.marsproxies.com:44443?_country=us&_state=alaska&_session=7ric72rl&_lifetime=30m",
"http://mr45184psO8:MKRYlpZgSa@ultra.marsproxies.com:44443?_country=us&_state=alaska&_session=jvtuogsy&_lifetime=30m",
"http://mr45184psO8:MKRYlpZgSa@ultra.marsproxies.com:44443?_country=us&_state=alaska&_session=po3xt1w7&_lifetime=30m",
"http://mr45184psO8:MKRYlpZgSa@ultra.marsproxies.com:44443?_country=us&_state=alaska&_session=88gijk21&_lifetime=30m",
"http://mr45184psO8:MKRYlpZgSa@ultra.marsproxies.com:44443?_country=us&_state=alaska&_session=wes8szpl&_lifetime=30m",
"http://mr45184psO8:MKRYlpZgSa@ultra.marsproxies.com:44443?_country=us&_state=alaska&_session=ntsyd9ux&_lifetime=30m",
"http://mr45184psO8:MKRYlpZgSa@ultra.marsproxies.com:44443?_country=us&_state=alaska&_session=5myzrqnk&_lifetime=30m",
"http://mr45184psO8:MKRYlpZgSa@ultra.marsproxies.com:44443?_country=us&_state=alaska&_session=80ow4rs7&_lifetime=30m",
"http://mr45184psO8:MKRYlpZgSa@ultra.marsproxies.com:44443?_country=us&_state=alaska&_session=i7f4cx3y&_lifetime=30m",
}
// Create a rate limiter to enforce delay between requests
var limiter = time.Tick(2 * time.Second) // 1 request every 2 seconds
// Buffered channel to collect scraping results
var results = make(chan Post, 10) // Store up to 10 posts
// Function to create an HTTP client with a proxy
func createProxyClient(proxyURL string) (*http.Client, string) {
parsedURL, err := url.Parse(proxyURL)
if err != nil {
log.Fatalf("Failed to parse proxy URL %s: %v", proxyURL, err)
}
proxyIP := strings.Split(parsedURL.Host, ":")[0]
transport := &http.Transport{
Proxy: http.ProxyURL(parsedURL),
}
return &http.Client{
Transport: transport,
Timeout: 15 * time.Second,
}, proxyIP
}
// Function to scrape a URL and send the result to the buffered channel
func scrapeURL(targetURL string, proxy string, wg *sync.WaitGroup) {
defer wg.Done() // Decrement WaitGroup counter when done
<-limiter // Wait for the tick to proceed
client, proxyIP := createProxyClient(proxy)
resp, err := client.Get(targetURL)
if err != nil {
log.Printf("Failed to fetch %s using proxy %s: %v", targetURL, proxyIP, err)
return
}
defer resp.Body.Close()
var post Post
if err := json.NewDecoder(resp.Body).Decode(&post); err != nil {
log.Printf("Error decoding JSON from %s using proxy %s: %v", targetURL, proxyIP, err)
return
}
// Send the result to the buffered channel
results <- post
fmt.Printf("Fetched post %d: %s (via proxy: %s)\n", post.ID, post.Title, proxyIP)
// Random sleep interval to simulate human behavior (1-3 seconds)
time.Sleep(time.Duration(1+rand.Intn(3)) * time.Second)
}
func main() {
// URLs to scrape
urls := []string{
"https://jsonplaceholder.typicode.com/posts/1",
"https://jsonplaceholder.typicode.com/posts/2",
"https://jsonplaceholder.typicode.com/posts/3",
"https://jsonplaceholder.typicode.com/posts/4",
"https://jsonplaceholder.typicode.com/posts/5",
"https://jsonplaceholder.typicode.com/posts/6",
"https://jsonplaceholder.typicode.com/posts/7",
"https://jsonplaceholder.typicode.com/posts/8",
"https://jsonplaceholder.typicode.com/posts/9",
"https://jsonplaceholder.typicode.com/posts/10",
}
var wg sync.WaitGroup // WaitGroup to manage Goroutines
for i, url := range urls {
proxy := proxies[i%len(proxies)] // Rotate proxies
wg.Add(1) // Increment WaitGroup counter
go scrapeURL(url, proxy, &wg) // Launch a Goroutine for each URL
}
// Launch a Goroutine to close the results channel after all requests complete
go func() {
wg.Wait() // Wait for all Goroutines to complete
close(results) // Close the channel when done
}()
// Process and print results from the buffered channel
for post := range results {
fmt.Printf("Processed post %d: %s\n", post.ID, post.Title)
}
fmt.Println("All requests completed.")
}
以下是预期输出:
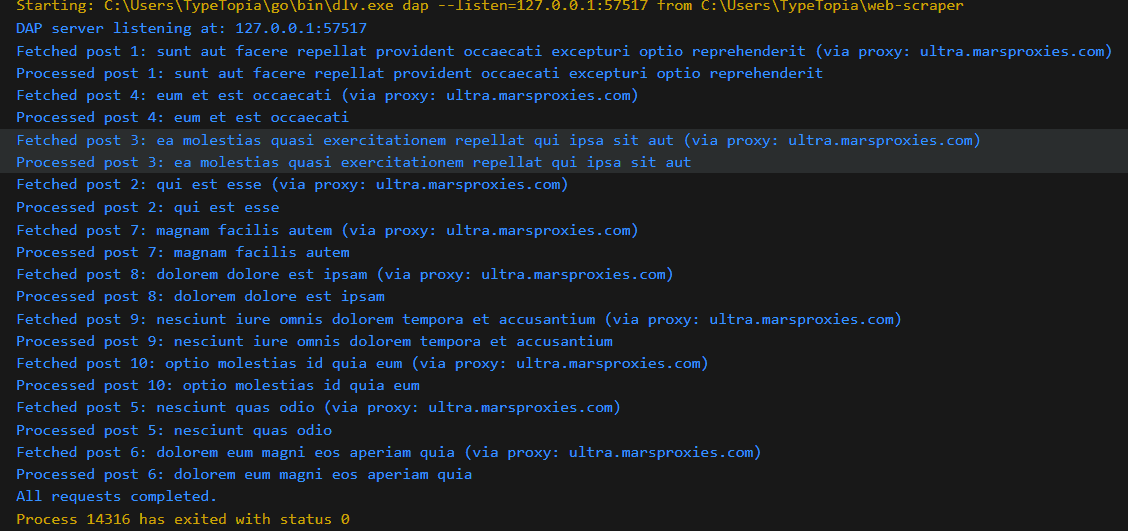
从返回结果的随机性可以看出,该爬虫能够同时处理多个请求。但为了避免被检测,它会在发送下一个请求前等待两分钟。为增强内存管理能力,采集到的数据会存储在一个临时的缓冲通道中。
如何测试与维护您的 Golang 网络爬虫?
现在您已拥有一个能够绕过大多数检测机制的升级版爬虫。即便做了这些改动,仍有许多方法可以进一步提升爬虫的效率,例如在网站更改 HTML 结构时及早发现错误,以及设置定期抓取任务。
为网络爬虫设置自动化测试
网站经常会更改其 HTML 结构,这可能会打乱数据抓取的流程。为缓解这一问题,您应设置自动化测试,确保爬虫按预期运行。以下是几种可用的测试类型:
- 单元测试:测试单个函数的功能,例如 URL 解析和 JSON 配置。
- 集成测试:确认爬虫能够连接到真实或模拟网站。
- 模拟服务器:使用模拟 HTTP 服务器来模拟网站响应。
设置定期抓取任务(使用 Cron 任务或任务计划程序)
除了自动化测试,实际的数据采集过程同样可以实现自动化。对于 Linux/Mac 设备用户,可以使用 Cron 任务按特定时间间隔调度爬虫运行。示例如下:
crontab -e
# Run scraper every day at midnight
0 0 * * * /usr/local/go/bin/go run /path/to/scraper.go
Windows 用户可以使用任务计划程序在特定时间运行爬虫。
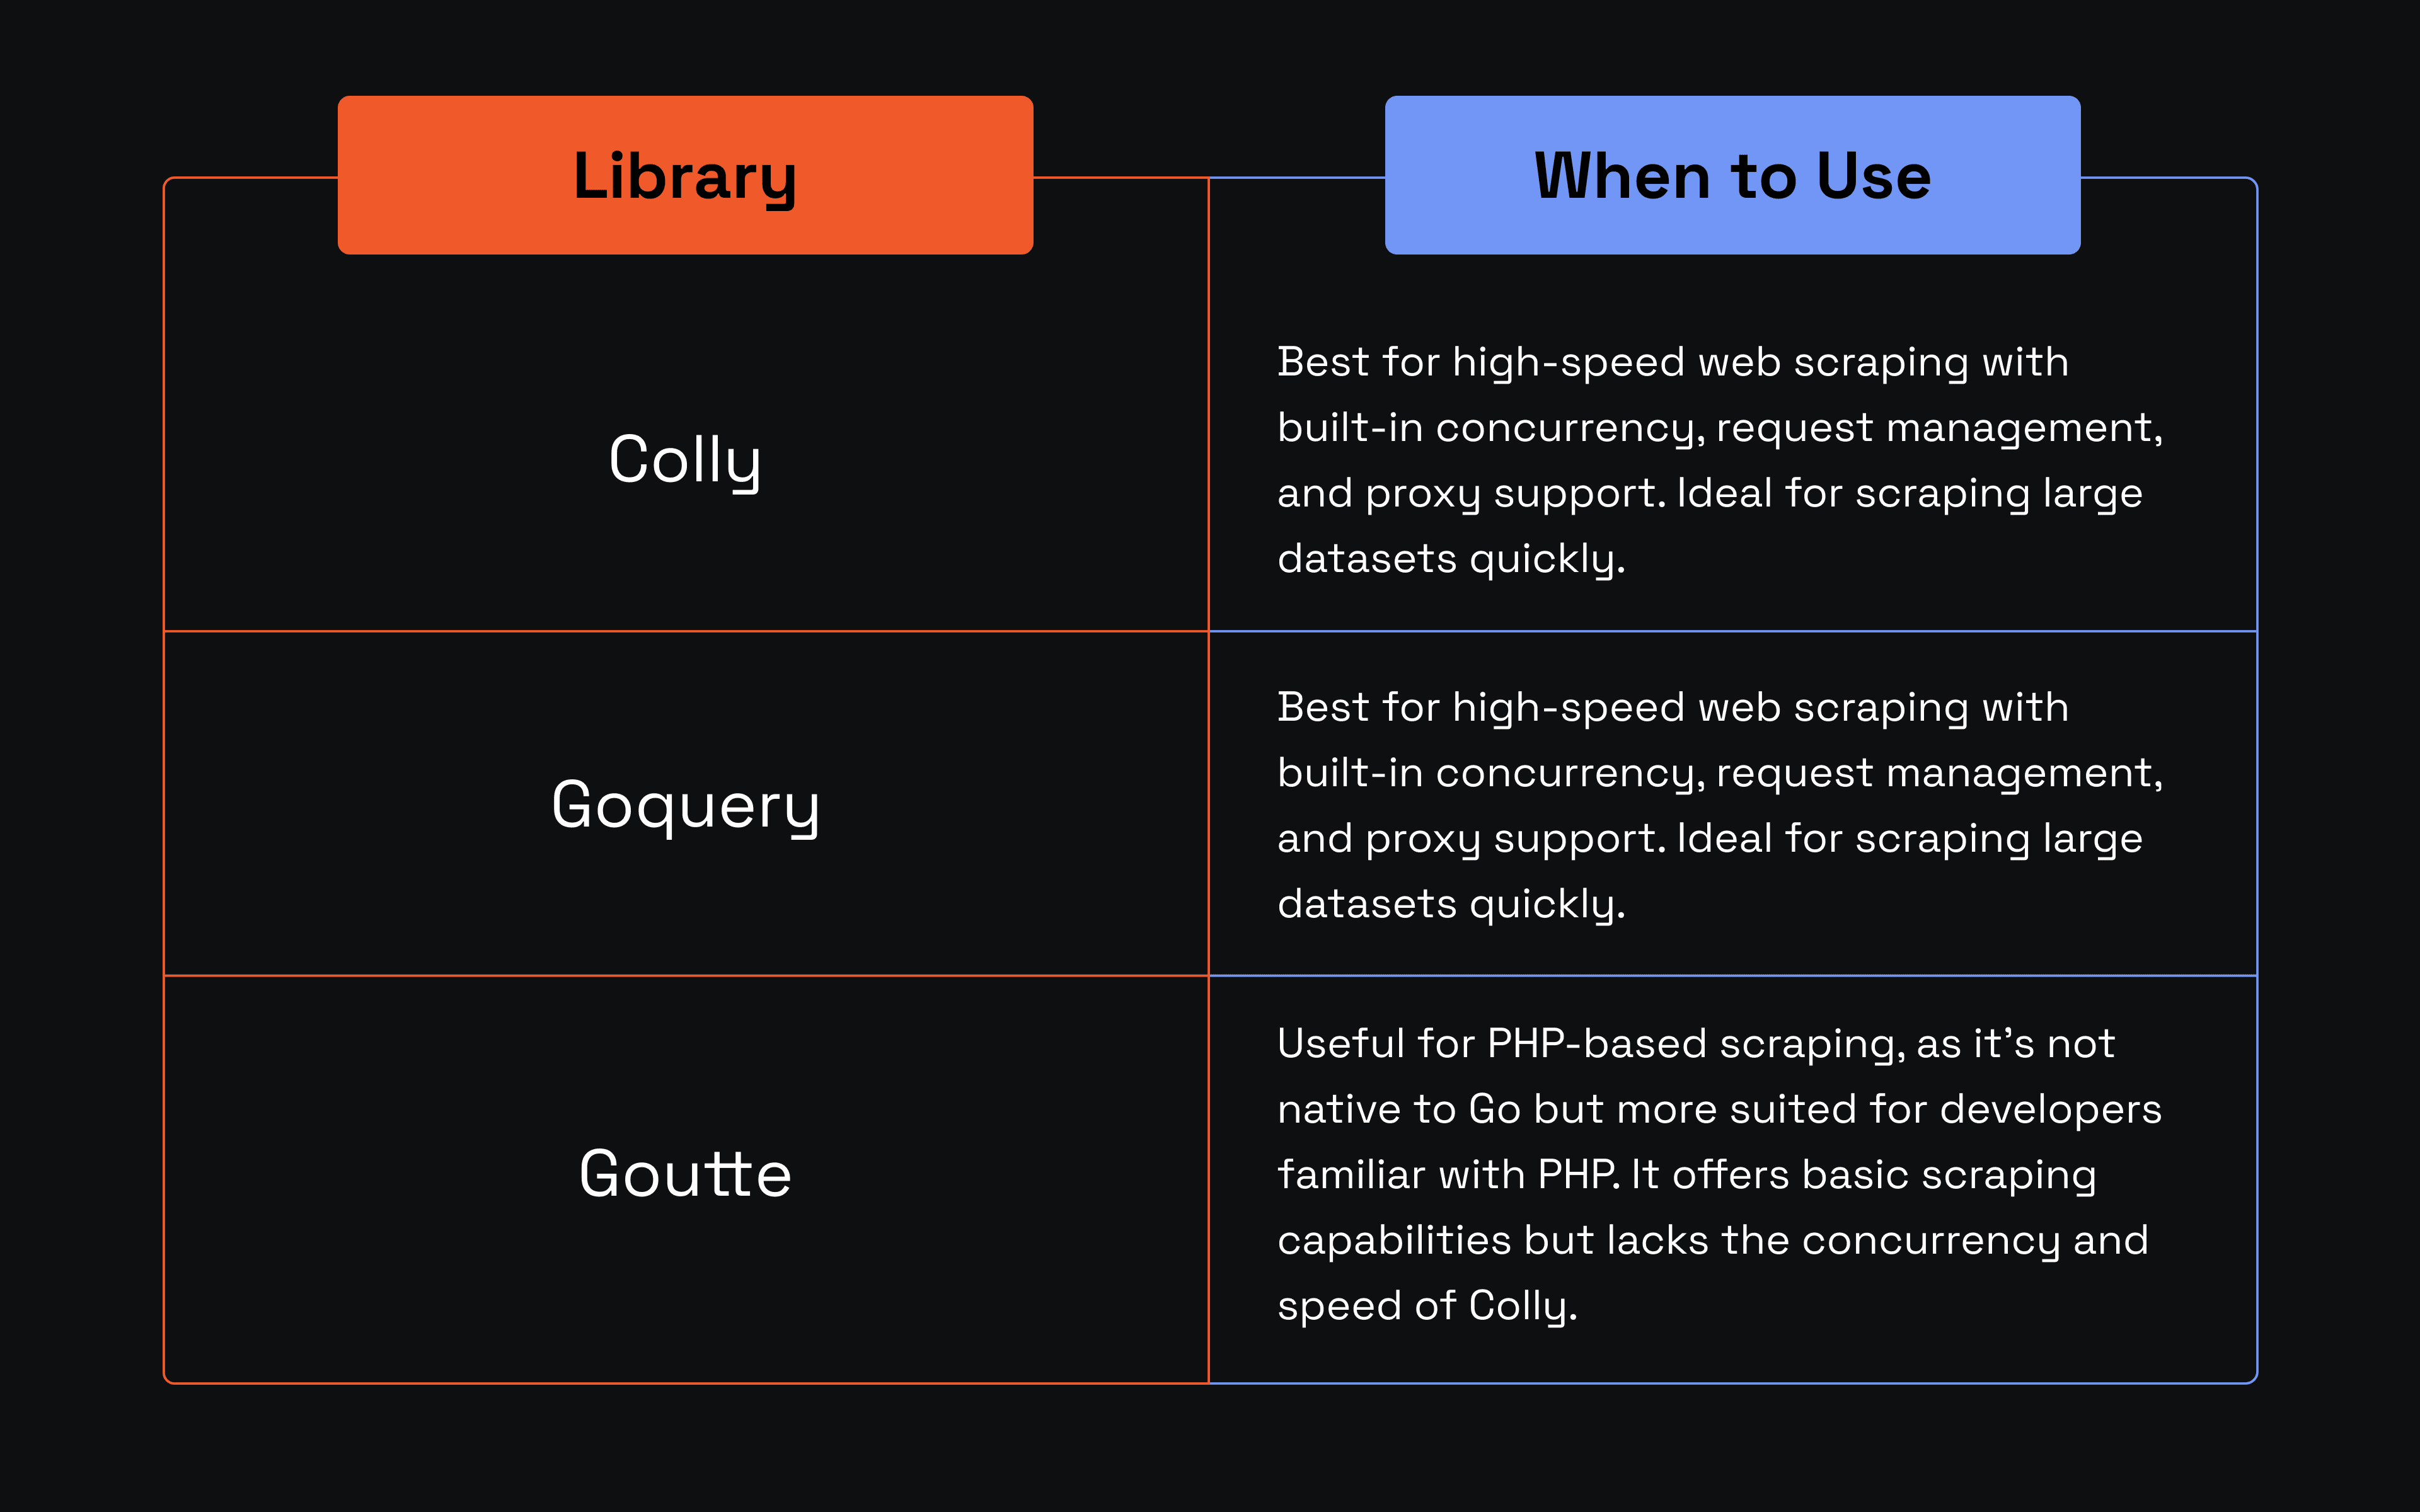
常见 Golang 网络爬虫库对比与使用场景
结语
希望本文为您提供了有关如何用 Golang 构建网络爬虫的实用技巧。正如您所见,您既可以构建一个简单的爬虫来提取静态 HTML 数据,也可以进一步升级以采集动态 JavaScript 数据,还可以通过轮换代理来规避检测。
要提升 Go 网络爬虫的性能,您可以实现并发与并行以提高效率、实现速率限制以避免被检测、并进行内存管理以节省资源。
最后,您还可以设置自动化测试,并安排爬虫在指定时间自动采集数据,无需人工干预。您也已经了解了三种常见网络爬虫库的对比,以及各自适用的场景。祝您挖掘更多数据!